HOW I UPCYCLED VINTAGE FURNITURE FOR PRIMARY BATHROOM
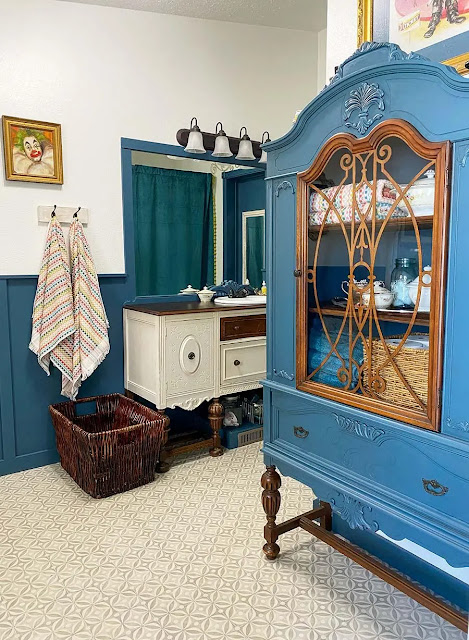
I decided to paint the vintage hutch in the primary bathroom. I’ve been debating on giving this piece a makeover for a while.Actually, deep down, I’ve always known I was going to paint it.
I just never got around to doing it.
It was one of those hard decisions do I paint the piece of vintage furniture or not?
I will say that I am so happy that I FINALLY did it and have no regrets.
Anyway, since I've repainted this piece of furniture, I thought I'd share how I've upcycles vintage furniture in my primary bathroom.
I think my bathroom is one of my favorite rooms in the house.
It's just kind of fun and quirky.
Member of the Amazon Services LLC Associates Program
FARM DUST AND PAINT is reader-supported. When you click and purchase through links or images on this page, I may earn an affiliate commission at no extra cost to you. Learn More.
HOW I UPCYCLED VINTAGE FURNITURE FOR PRIMARY BATHROOM
Let me share a before photo of the hutch I painted so you can see how beautiful vintage pieces look with a coat of paint.
This vintage hutch is where we store a handful of bathroom towels and miscellaneous bathroom supplies, like shampoos, conditioners, soaps, bandages, first aid, cotton balls, and Q-Tip's.
Most of the items are hidden in the bottom drawer.
As for paint, I used the same blue latex paint used on the walls.
Because I used latex paint, I had to prep the piece well, with a good cleaning and a gentle sanding.
I have used latex paint on furniture many times over the years.
The key is patience and prep work.
Foam rollers work best for no brush lines and apply thin coats letting each one dry before applying the next one.
It also takes about 30 days for latex paint to cure, so you will notice I did not paint the wood shelves.
I knew I needed to have this piece back in working order ASAP, and if I painted the shelves, I wouldn’t be able to let the paint cure.
If you don’t give your paint time to cure, you end up with scratches.
It took two layers of blue, and then I added an antique glaze to change the color slightly from the wall color.
I am so happy with how it turned out. SO PRETTY!
If you're looking for a unique piece for bathroom storage, here ya go.
THE BATHROOM VANITY
The bathroom vanity was created by cutting a hole in the top of an old vintage buffet and using drop-in sink.
Originally, I wanted to use a vessel sink like in our guest bathroom, but we would have had to alter the height of the buffet, cut the legs down, and it just wasn’t worth it, so we went with the drop-in sink instead.
I painted the buffet with a vintage white and did an antique glaze.
The two center drawers were modified for water pipes, just like I had to do in our guest bathroom with that dresser turned vanity, but the drawers still have space for storage.
(I'll leave a link for my guest bathroom vanity at the end of this post.)
THE MAKEUP VANITY
Yep, another piece I repurposed years ago is my makeup vanity.
I don’t remember the color, but I used Fusion Mineral Paint and Fusion Mineral Paint Antiquing Glaze.
Fusion Mineral Paint is a great choice for furniture because it doesn’t give the chalk paint texture.
If you don’t have experience or patience with latex paints or like the look of chalk paint, I recommend.
YES, THERE ARE CLOWNS IN MY BATHROOM
Yep, that’s clown art scattered across the primary bathroom.
I know clowns are not for everyone, so creepy, but I like them, along with beautiful circus-style performing acrobats.
Life is short, decorate your home in a way that you love.%20(1).png)
%20(Pinterest%20Pin).png)


%20(800%20x%20600%20px)%20(1).png)
.png)
